Thursday, December 27, 2012

Coffee Meringues - Calling all Coffee Lovers

Celebrated my hubby, Vibes' birthday this past weekend..yayyy!!! I wanted to make it extra special for him. These past few months have been very stressful for us, and he has been nothing but a darling to me. Just making sure he knows I appreciate him in my life :)

Yes, I even hand-painted the Coffee Mug for him..That's his name in made-up musical notes!!
Now, nothing makes him more happy than coffee, chocolate and music. He plays the keyboard. So, I thought why not bring everything together. Say Hello to Chocolate covered Coffee Meringues..in a personalized coffee mug :D. The verdict, he absolutely loved them. He popped one, crunched a couple of times and said, "These are the fluffiest and lightest little cookies I have ever tasted..." then continued, "..and yet they are not too sweet, melt away while leaving a lovely coffee flavor with a tiny bit of chocolate..hmmm Interesting." I was elated and floored, both at the same time. I smiled confidently and said "I'm glad you like them", like I knew what I was doing. AHEM..to be very honest, this is the very first time I have made or even tasted a Meringue...shhhhh..he need not know though!

I really didn't know what to expect when I started whipping those egg whites. You see, I originally set out to make Macaroons. While researching, stumbled upon Ms. Humbles' Macarons 101. Nothing beats it..if you ever plan to make Macaroons be sure to read Ms. Humble's Not So Humble Macaron recipe and tips. I know I am going to as soon as I get my kitchen scale which is right now in transit..woot woot!! Anyways..in the meantime, I tried Ms. Humble's Meringue recipe.

If you are not in the mood for heavenly and loaded Chocolate Chip Cookies, then these are definitely a good choice. With just 10-15 calories a piece, these are sure to steal your heart..and of course you can make these Chocolate flavored. Simply replace coffee with Dutch processed cocoa..alkalized cocoa powder works best with meringues..Voila!!

I am really sorry I don't have pictures of the step by step process, because I was almost sure I was going to ruin it..but I guess I didn't..surpriseee!! Although if you compare Ms. Humble's Meringue pictures with mine, seems to me like my meringue should have been beaten a tad bit more..or maybe my disastrous piping skills made it lose the built up air in it. Hmm..guess that is it! Nonetheless I promise this is surely not the last time I am making these, and will take pictures next time and update the post, maybe this time I'll make them chocolate instead.

Coffee Meringues (yields around 50-60 cookies)
Adapted from Chocolate Meringues by Ms. Humble

4 Egg Whites
14 tablespoons White Sugar
Pinch of Salt
1/2 teaspoon Vanilla Essence
2 1/2 tablespoons Instant Coffee
Some Melted Chocolate (optional)


Arrange the oven racks to be somewhat in the middle, we'll be using both. Preheat the oven to 175°F. Line 2 baking sheets with parchment or silicone baking mats.

Prep a pastry bag with a large round or star tip (I used Wilton 1A round) or if piping bags are not your style, Ms. Humble recommends cutting a half-inch in diameter opening in the corner of a zip top bag. I placed the piping bag in a tall glass and made a pocket on top for easy filling. Easier said than done..despite watching wonderful Youtube videos, and a pocket I managed to have the filling come out the other way while piping..sighhhh! Moving on...

Combine the egg whites and sugar in a stainless steel bowl over a pan of simmering water. Whisk constantly over the water until the sugar has dissolved and the mixture is warm to the touch (roughly 3-4 minutes).

Remove from heat and transfer the mixture to a different stainless steel or copper bowl for further beating. If using stainless steel add a pinch of salt and start beating with a hand held mixer or the wire whip attachment of a standing mixer. Start on low speed and gradually increase until stiff, glossy peaks form. Took me about 8-9 minutes at speed 6.

Take the bowl off the standing mixer and add the vanilla and sift the coffee powder to break any lumps. Fold to combine with a rubber spatula, taking care not to deflate the egg mixture.

Add the mixture to your pastry bag and pipe rows of quarter sized meringues onto the pans. The piped meringues can just be about 1/2 inch apart. They will not spread while baking, if the mixture of the right consistency.

Place the prepared sheets in the oven simultaneously. These need to be slow baked for 2 hours until they lift from the pan easily. I placed them lengthwise one on each rack and on opposite sides. Set the timer for 1 hour. Then reposition the sheet pans so as to ensure even baking. Set timer for another hour. Remove both pans and allow to cool for about 10 minutes. Transfer the meringues to a wire rack and allow to cool completely.

Melt some chocolate in a microwave or over a double boiler, and either make sandwiched meringues or simply drizzle some over the meringues. I used a homemade disposable parchment paper cone for this. Allow for the chocolate to set completely (couple of hours).

All done..store these in air tight jars. Since these were plenty, I even packed some for a Coffee loving friend as a Holiday gift. Happy Whipping!!!


Thursday, December 20, 2012

My Precious Chocolate Chip Cookies.....We wants one!


Nothing says 'You're special' better than Chocolate. Chocolate in any form, a bar, a cake, a fondue, a pastry, with fruits, baked, sprinkled...or a Perfect Chocolate Chip Cookie...it just always works!!

Stuff 'em up in a Big Cookie Jar with a pretty bow, and Smeagol would think "We wants one!!"...Yup yup Lord of the Rings and a die-hard Gollum fan!! :D
Anyways, to me this just seemed as the best "I'll Miss You" gift for a 4 year Toddler who I know loves spicy food and Desserts. Why Miss you, you ask?..Aah cos he is my neighbor's son and they moved away this past weekend. We'll surely see them often, but I really miss coming home to those occasional "Hi Jyoti Aunty."...aww I just had to bake him some quality cookies; And these lived to my expectations. His Mom reported back, that he loved 'em so much that he'd like to bake some with his Mom this holiday Season. So while they get baking, I thought I'll spread the word on how awesome Ashley's Chocolate Chip Cookies really are.

Came across Ashley's wonderful website Not Without Salt, while looking for the best choc chip cookie recipe out there. And the moment I saw them I could hear Angels not only sing, but also play their harp. LOL..I have been looking for a Ghirardelli-like chocolate chip cookies. Those in my opinion are awesome most cookies, with a chewy center and the decadent chocolate square chips...ummm that's purely indescribable! And these Chocolate chip cookies are just that. Ashley isn't joking when she says, "It is the last chocolate chip cookie recipe you'll ever need." Hear ya Ashley, and while savoring one right now Growling Tummies Approved. :)

Also, this is post goes out to all the wonderful kids in my life...each and everyone of them. All you munchkins will be very special to me forever...especially my lil niece Annvi, who wanted to travel via the phone to come bake and eat these choc chip cookies <3<3

Before you begin baking, I suggest you read Ashley's Chocolate Chip Cookies Revisited which also directs you to Dana's Perfect Chocolate Chip Cookies. I used a few tricks that they have been kind to share, and I'll share them with you in form of pictures :)

Chocolate Chip Cookies Ingredients (yields 30-35 cookies depending on how big or small you bake..plenty to go around ;))
  • 1 Cup or 2 sticks Butter (8 oz) (I used Salted butter..but you can use Unsalted)
  • 1/4th Cup White Sugar (2 oz)
  • 1/4th Cup Turbinado Sugar (2 oz)
  • 1 3/4th Cup Brown Sugar (12 oz)
  • 2 Eggs
  • 1 Tsp Vanilla Essence (Original recipe calls for 2, but I only had 1 on hand..didn't miss it :P)
  • 3 1/2 Cup All Purpose Flour (1 lb)
  • 1 1/2 tsp Baking Soda (Make sure it's fresh)
  • 1/4th tsp Salt (Original recipe calls for 3/4th tsp..but I compensated for the Salted butter)
  • 12 oz Chocolate (For the amount of Sugar the recipe calls for I used 4oz of Unsweetened 100% cacao, and the rest 8oz was Semisweet chocolate chips. I didn't notice the unsweetened part except for when trying to lick the melted chocolate after baking was over :D..seriously don't do it! ;))
  • Handful Salted Macadamia nuts (optional)
Preheat the oven to 360ºF. Place the rack in the middle of the oven. (Only if you are going to bake as soon as the dough is ready. I hear you saying, "Hell ya..I am baking it asap...what do you mean only if..."... LOL..OK OK, but I let it rest for a minimum of 4 hours in the refrigerator)

Line your sheet pan with parchment paper and keep aside.

Cream the butter and the sugars until very light and fluffy, about 5-7 minutes on medium high.
That's a lot of sugar! Light and fluffy on the right...Creamed it for about 7-8 minutes at speed 6.
Scrape down the sides of the bowl. Continue mixing at a low speed, while adding 1 egg at a time. Make sure the first egg is incorporated completely before adding the next.
After each egg incorporation
Add the vanilla and Scrape the bowl down. Scrape the bottom of the bowl too.

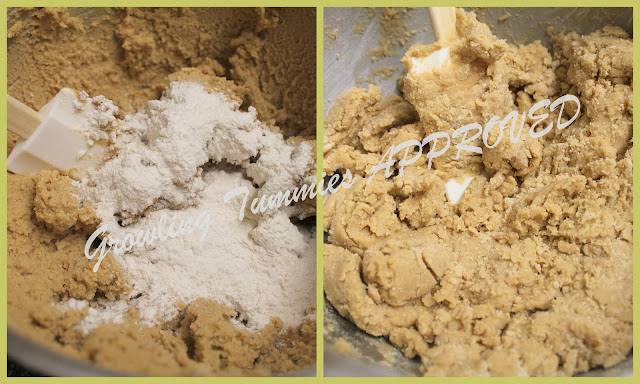
Mix the flour, soda and salt in a separate bowl and whisk to combine. Now with the mixer on a low speed, slowly add almost all the flour. Reserve a good 1/4th cup of the flour mixture.

Mix only until just combined. Be careful to not over mix. This took about 40 sec on the STIR speed.
Look at the white streaks of flour. Just combine, don't over mix! (I know, bad lighting)
Remove the bowl from your stand mixer and add the remaining flour and mix with a spatula. Again, don't over mix. We still have the chocolate to be combined, everything will be taken care of then.

Don't worry about the white streaks of flour, we still have to mix the chocolate in.
Time to add the chocolaty goodness now. I used 4 oz of unsweetened 100% cacao and remaining 8 oz were semisweet choc chips. Add it all in at once.


Stir until just combined. You will see all the flour getting mixed too.
Cookie Doughn't you want some...yeah am a Coldstone fan!! :P
Alright, now it's time to refrigerate the dough. If you cannot resist, then use a 1 1/2 tablespoon ice-cream scoop to scoop out mounds of dough on a lined sheet pan. Allow the scooped out mounds to rest on your counter for about 10 minutes before baking. Trust me it helps!!!

If you are like me and believe in allowing the dough to rest, then follow the steps below, for ease of baking later.

Divide the dough into 2 parts and shape them in form of logs. Wrap them in plastic and refrigerate them for at least 4 hours.

When ready to bake, preheat the oven and line your sheet pans. Have at least 2 ready.

Take out the dough from the refrigerator and carefully cut the log into about 1/4 inch sized pieces. This will make smaller cookies. If you want big sized cookies cut them about 1/2 inch long. To render it some shape, I pressed each square log shaped piece into an ice-cream scoop and laid it down on my sheet pans.


Leave at least 2 inches between each dough mound. No need to press down the dough, leave the mounds as is. At this point you can add some Sea salt or even chopped Macadamia nuts.
I got about 12 smaller cookies per sheet.


 Set the sheet pan in the oven on the middle rack, and bake only one at a time for exactly about 12 minutes.
The cookies should be golden brown on the outside and gooey and should seem undone in the center. You would want to bake more, just looking at them, but trust the recipe. They continue to cook as they cool, so do not overbake!!!

Right out of the oven...Yummmayyy..the really hot ones are sooo goooeeeey and delish!!!
Leave these undisturbed on the pan for about 2-3 minutes and then carefully transfer on a wire rack to cool. The cookies should easily come off the lined paper.


Dig right into these delicious cookies. Oh and don't forget the rest of the prepared cookie sheets. I am baking 2 batches today, will take more pics with the macadamia nuts and update the post.

Update: As promised the Salted Macadamia Nut Chocolate Chip Cookies

Happy Cookie Baking and Wishing you and your family Happy Holidays 2012!!! :)

Tuesday, December 11, 2012

Whole Wheat Pasta with Roasted Red Pepper Sauce

Tonight we came home from work with Growling Tummies, as usual :D. I really wanted to fix a quick dinner, but I am so bored with all the regular choices..same old daily routine. So I decided to spice it up a bit. But, all I had on my hand were a few mushrooms, a jar of Roasted peppers and baby spinach. You would think I would have a stocked up refrigerator on a Monday from the weekend groceries...umm yeah what happened there? Seriously..I don't know..we even went grocery shopping...but I guess I was just focused on getting my baking goods for the Holidays, I completely forgot about basic everyday stuff. :)..Of course, I am going to share with you what I bake ^-^

Anyways, long story short..I was short on ingredients :P. But, I remembered the jar of Roasted Peppers I picked up at a local produce market. I love that place, they have the freshest produce in town and also support local growers and businesses. Grrrrrr8..gotta appreciate such places. Back to the Roasted peppers..well I thought the quickest meal to put together would be pasta and let's combine that with Roasted Pepper sauce of some kind. So I was on my way to look for some recipe that could do that for me, and I just found the perfect one..Behold The Pioneer Woman...Love Ree's website and instantly fell in love with the recipe. I made my own version of it, but was a great inspiration, easy and so so quick. The taste of freshly roasted peppers has to be uber delicious, but the jarred ones did the trick for us :)..I am sure to roast some peppers at home the next time I need them, just like Ree has described in her recipe, considering I don't forget to buy groceries, despite at a grocery store..LOL ;)


I use pasta to feed veggies to my husband. If I mix it up with pasta 2-3 cups of spinach is a piece of cake :D, makes me happy. So go ahead and use all sorts of vegetables you like or even meats or seafood. The pasta dish with the sauce is so light yet filling, looks gorgeous and tastes fresh and delish...surely Growling Tummies approved :)

Whole Wheat Pasta with Roasted Pepper Sauce Ingredients (yields generous portions for 2, and doubles up beautifully)
Adapted from Pasta with Roasted Pepper Sauce by The Pioneer Woman
  • 2 Cups Whole Wheat or Regular Pasta (I use Organics Whole Wheat Rotini)
  • 2 1/2 Tablespoons Dry Roasted Pine Nuts** (I roast raw Pine Nuts on a low flame myself)
  • 2 Whole Roasted Red Peppers (I used jarred..you can roast 'em yourself)
  • 1/2 Medium sized Onion or 1 Shallot; finely diced
  • 4-6 cloves of Garlic; finely diced (I used 6 cos we love garlic, you can use less depending upon your choice)
  • 2-3 cups of Baby Spinach (You can use vegetables of your choice)
  • 3-4 medium sized Crimini Mushrooms (You can definitely use chicken, shrimp, or meat of your choice too)
  • 1/8th Teaspoon Red Chilli powder or Paprika Flakes (optional)
  • Pinch of Turmeric powder (optional)
  • 1 Teaspoon EVOO and more to sauté
  • 2 Tablespoons Milk or Cream** (I used Reduced fat milk)
  • Salt to taste
  • Black Pepper to taste
  • Grated Parmesan for serving
  • Water to boil pasta
Directions:
  • Bring a pot of water to boil and add pasta and a tablespoon of salt (don't add the salt until water has boiled, it stops the water to reach it's boiling temp)
  • In a small pan dry roast the pine nuts on low flame and toss it into a blender cup
  • In the same pan add some EVOO to sauté the diced onion and garlic on a medium low flame (I will not include how much oil, cos I use oil sparingly. Feel free to add as much as you like for sautéing)
  • Once the onion is transparent, about 4-5 minutes, add the garlic and sauté about 2-3 minutes more
  • At this point I add the chilli / paprika and turmeric, but this is absolutely optional. Being an Indian I am used to throwing these spices just in about everything I cook. This is my seasoning, but feel free to season it with salt and black pepper.
  • Transfer the sautéd onion and garlic mixture to the blender cup also. Now it's time to add the roasted red peppers
This jar of Roasted Peppers is preserved in water is only 10 calories a piece..Bingo!!
  • Add 1 teaspoon of EVOO to the mixture and Blend the ingredients to form a smooth paste
  • I do not add salt to it because I like to make adjustments right at the end of my cooking. That way I know exactly how much you need, and you can avoid consuming too much :)
Look at the gorgeous color!!! So pretty!
  • Keep the lid of the blender tightly secured on the blended mixture. I don't like exposing it to air, just a teeny tiny pet peeve :P
  • While the pasta was still happily boiling away, I began finely slicing the mushrooms. Fine sliced mushrooms melt away when cooking, and I really love that :)
  • In a different wider sauté pan, at this point you can start working on your vegetables or meat
  • If using vegetables sauté them with a pinch of salt and black pepper. If using meats make bite sized pieces of meat and cook them with some salt and at least a couple of tablespoons of the sauce. I like meats to catch the flavors and actually be a part of the final dish. Shrimps can be tricky, try not to cook them for too long or they will get chewy. Surely cook them with the sauce but only until they are half done, cos shrimps continue to cook even when taken off the pan, definitely set them aside.
  • While veggies or meats are cooking, drain the pasta, and reserve 1/3rd cup of the pasta water, just in case
  • Add it to the pan and throw the entire sauce into the pan. Add the 2 tablespoons of milk or cream and mix well.
  • Add the baby spinach and mix well.
  • Cook only for an additional 2-3 minutes on a low medium flame, just until the baby spinach wilts. This gives the sauce to cook through and stick to the pasta as well.
  • Taste and adjust the salt and pepper. I just needed 2 tablespoons of the reserved pasta water, but that's it, so yeah eyeball it to your liking.
  • Add freshly grated parmesan cheese on top and serve (I added more black pepper when serving)
The sauce is a burst of flavors in your mouth with pine nuts making their way right at the end of it all, and it tastes so so fresh....Yummmay. I hope you enjoy it as much as we did. Happy Pasta Night!! :)

 **Note: Pine Nuts can be subbed with Walnuts in almost all pasta sauces that call for Pine Nuts. I have even made Basil Pesto with Walnuts instead of Pine Nuts, and it tastes great.
**Note: I also wouldn't miss the milk. Unless you are adding a good amount of cream like the original recipe, I really don't think it matters. The blended sauce is so thick and creamy I really didn't need more cream.

Sunday, December 9, 2012

100% Whole Wheat Pizza Dough

I really am not that big a fan of pizza..I know I know who doesn't like pizza..Me? :P
There is nothing to not like about a pizza, there's bread with tomato sauce topped with Vegies (that I love) and yet topped with cheese..that gooey bubbly goodness you bite into which melts in your mouth with the chewy crust..ummm tastes awesome...but I am still not a fan. I guess the white flour crust with mozarella leaves me feeling very bloated..sorry don't mean to taint your pizza eating experience, but coming from a family where we ate only homemade Indian healthy and light food, I think I am just not cut to process pizza. Ohhh, you must think Indian food and light??? Yeah, everyday meals in India usually do not involve heavy creamed entrees and naans...or at least not at my place. Being a working Mom and a staunch believer of coking from scratch, Mom made plain Rotis and all kinds of quick vegetables everyday. I think the heaviest we went were special, once in about 6 months Sunday breakfast, my Grandma's delicacy "Dal & Pakwaan." Dal is lentil entree made from 'Chana Dal or Bengal gram' that you can easily find in Indian grocery stores...will share that recipe soon..its very light and healthy. Pakwaan on the other hand is all-purpose flour dough knead with mostly oil, rolled into medium sized tortillas and then deep-fried in oil, much like the crispy Mexican tostada bowl crusts. Nostalgia...anyways...back to the present day!
Mu hubby on the other hand loves pizza...yeah I am the abnormal one :D. Anyways, I don't have pizza and poor thing does not bite into one either..he feels guilty to consume all those calories..well so I thought let's try making a whole wheat pizza at home. After all gotta give him some love back for surprising me with my very own new shiny Red Kitchen Aid for my birthday...he is a sweetheart ;)
I couldn't believe the happiness on his face when I announced "Let's make pizza tonight"...he quickly picked up his phone and started making a list of veggies he is going to get for toppings..LOLL
While he dashed out to fulfill the toppings list..I followed the below recipe to make the whole wheat dough for the crust. I skimmed through a lot of recipes, but this one was really easy to put together, is ready in less than 2 hours and is ideal for an impromptu announcement of "Let's make pizza tonight"...HAHAHAHA
Also, I used regular 100% whole wheat flour I use for making Rotis at home and can find easily at my local Indian grocery store. I really wanted to test my regular wheat flour that I always have on hand in abundance :)
Thank You Stephanie (aka girlversusdough) for sharing the original recipe. This is the best pizza crust ever. I am going to have friends over during Holidays, and I am sure to serve this pizza on one of my get togethers. This is definitely Growling Tummies approved!!! :)
100% Whole Wheat Pizza Dough Ingredients (yields 1 Large Thin Pizza crust)
  • 2 1/2 cups Whole Wheat flour and more for dusting; all divided (Indian store bought atta works like a charm)
  • 1 packet Active Dry yeast
  • 3/4 th teaspoon Salt
  • 1 cup Warm Water (It should be warm just enough so you can easily touh the water, but warmer than room temperature. If you have a kitchen thermometer, the ideal temparature is between 100-110 degrees F)
  • 1 tablespoon EVOO
  • 3 teaspoons Sugar; also divided (next time will try 2 teaspoons and post results)
Directions:
  • In a (2 cup) measuring cup, combine water and 1 tsp sugar. Let sit for 5 minutes.
  • In a large bowl or bowl of a stand mixer, combine 2 cups whole wheat flour, salt and remaining 2 tsp sugar. Make a well in the center of the bowl and pour the yeast mixture and 1 tbsp EVOO.
  • Now begin Stirring at the Stir speed using the dough attachment, or use a rubber spatula if kneading by hand.
  • The dough should just come together, it will be very sticky at this point. Continue kneading in the mixer or by hand while adding more flour in 1 tbsp at a time (from the remaining 1/2 cup flour). Try not to exceed the 1/2 cup limit, it is easy to get carried away, cos the dough is so sticky. This should take about 3-4 minutes or make sure to knead that long to work the gluten in the dough.
  • Add only as much is needed to pull the dough away from the sides of the bowl and is no longer sticky. At this point even I like to finish by hand. Lightly oil your hand with EVOO and knead for a couple of minutes with your hand.
  • Shape dough into a ball. Lightly grease the bowl, or a separate bowl with EVOO. Also lightly grease the dough bowl, place it in the greased bowl, cover it with a kitchen towel tightly tied around the bowl, or a greaed plastic wrap.
  • Place it in a warm place to rise. I use the oven with the Oven light ON, always does the trick, especially in the cold months.
  • Let it rise for about 45 minutes to an hour, until doubled in size.
  • Punch down the risen dough, shape into a ball and place on a lightly floured pizza pan (or stone, I don't have a stone).
  • Roll it out in a circle of desired thickness, I made a thin crust large pizza. Let it rest about 10 minutes.
  • Preheat oven to 500 degrees F. Add the toppings of your choice. Place the pizza in oven and bake for about 10-15 minutes, or until crust turns golden brown and toppings are baked enough.
  • Let pizza rest for 10 minutes before serving. These were the longest 10 minutes...hubby oggled at the pizza with a timer in his hand and kept looking at it every 10 seconds..Is it up yet?? No..Is it up yet?? Nooooo..LOL